Asp.Net Core Blazor&Blazorise快速实践
前言
Blazor非常容易上手开发前端项目,结合一些封装好的UI框架更能省心省力。Blazorise(https://blazorise.com/)应用广。ABP中,默认接入了Blazorise,个人非常喜欢使用ABP完成,整个模块化设计巧妙,因此也想要从UI层面同步使用Blazorise。
Blazorise
皮肤(CSS 框架)和骨骼(C#实现UI组件)分离,皮肤支持 Bootstrap、Tailwind、Bulma、AntDesign、Fluent 2 和 Material 等 CSS 框架。Blazorise提供了众多常用的组件,基于这些组件,可以隔离具体使用的CSS框架。令开发人员只关注于UI展示与交互。
在官网中,提供了一些常用的构建块,能够节省不少开发工作。
搭建Blazor项目
快速用命令行搭建Blazor WebApp(Server)项目。此处基于DotNet8.0
dotnet new blazor -f net8.0 -int Server -n BlazorServerBlazoriseDemo.App
接入Blazorise
参照Blazorise官方教程,此处简化几个步骤。
增加CSS框架
此处使用Bootstrap5和图标库
Install-Package Blazorise.Bootstrap5
Install-Package Blazorise.Icons.FontAwesome
还有其他包可以配套使用,除了Nuget包,还需要配合css和js文件,具体见官网使用。
- AntDesign
Install-Package Blazorise.AntDesign
Install-Package Blazorise.Icons.FontAwesome
- Bootstrap4
Install-Package Blazorise.Bootstrap
Install-Package Blazorise.Icons.FontAwesome
- Bulma
Install-Package Blazorise.Bulma
Install-Package Blazorise.Icons.FontAwesome
- FluentUI2
Install-Package Blazorise.FluentUI2
Install-Package Blazorise.Icons.FluentUI
- Material
Install-Package Blazorise.Material
Install-Package Blazorise.Icons.Material
- Tailwind
Install-Package Blazorise.Tailwind
Install-Package Blazorise.Icons.FontAwesome
配置css和js文件
因使用的DotNet8下WebApp的Server模式,在App.razor中删除存在的默认bootstrap.css和fontawesome文件,增加blazorise配套的系列css文件和js文件引用。
<!DOCTYPE html>
<html lang="en">

<head>
    <meta charset="utf-8" />
    <meta name="viewport" content="width=device-width, initial-scale=1.0" />
    <base href="/" />

    <link href="https://cdn.jsdelivr.net/npm/bootstrap@5.3.3/dist/css/bootstrap.min.css" rel="stylesheet" integrity="sha384-QWTKZyjpPEjISv5WaRU9OFeRpok6YctnYmDr5pNlyT2bRjXh0JMhjY6hW+ALEwIH" crossorigin="anonymous">
    <link href="_content/Blazorise.Icons.FontAwesome/v6/css/all.min.css" rel="stylesheet">
    <link href="_content/Blazorise/blazorise.css?v=1.7.6.0" rel="stylesheet" />
    <link href="_content/Blazorise.Bootstrap5/blazorise.bootstrap5.css?v=1.7.6.0" rel="stylesheet" />

    <HeadOutlet @rendermode="InteractiveServer" />
</head>

<body>
    <Routes @rendermode="InteractiveServer" />
    <script src="_framework/blazor.web.js"></script>
</body>

</html>
需要注意如下两行,需要配置渲染模式,默认的App.razor中没有配置。
<HeadOutlet @rendermode="InteractiveServer" />
<Routes @rendermode="InteractiveServer" />
配置命名空间依赖
_imports.razor中增加Blazorise命名空间引用
//...
@using Blazorise
服务注册
在Program.cs中完成Blazorise服务注册
//...
var builder = WebApplication.CreateBuilder(args);

//...

builder.Services
    .AddBlazorise(options =>
    {
        options.Immediate = true;
    })
    .AddBootstrap5Providers()
    .AddFontAwesomeIcons();

var app = builder.Build();

//...
移除文件
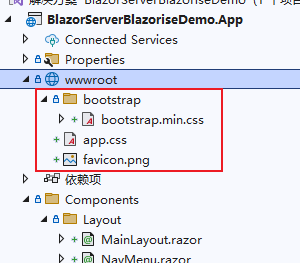
确保整个项目内容简单,移除wwwroot下不需要的文件,如下这几个文件都可以移除。
使用Blazorise组件
Counter
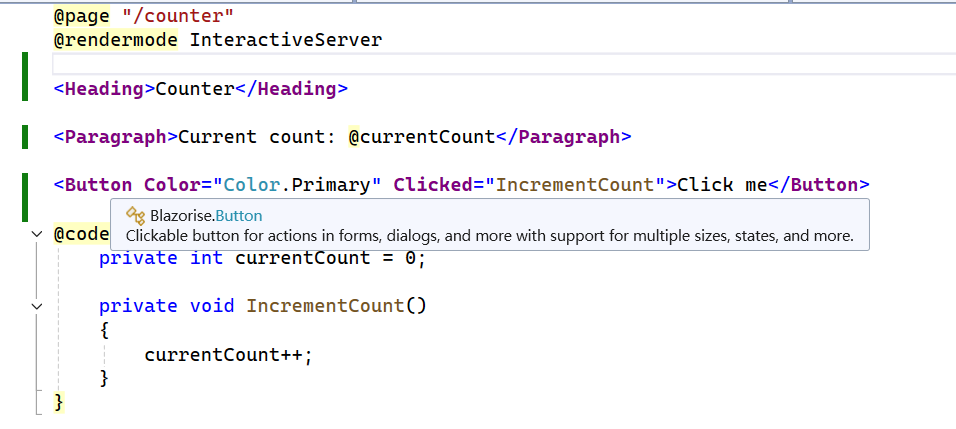
此处,仅将计数器页面改造成使用Blazorise组件,如下Heading、Paragraph、Button等都是Blazorise中的组件。
 具体代码如下
@page "/counter"
@rendermode InteractiveServer

<Heading>Counter</Heading>

<Paragraph>Current count: @currentCount</Paragraph>

<Button Color="Color.Primary" Clicked="IncrementCount">Click me</Button>

@code {
    private int currentCount = 0;

    private void IncrementCount()
    {
        currentCount++;
    }
}
同时修改下其他几个文件,MainLayout.razor,NavMenu.razor,都改成支持Blazorise。
MainLayout
@inherits LayoutComponentBase

<Layout Sider>
    <LayoutSider>
        <LayoutSiderContent>
            <NavMenu />
        </LayoutSiderContent>
    </LayoutSider>
    <Layout>
        <LayoutHeader Fixed>
            <TopMenu />
        </LayoutHeader>
        <LayoutContent Padding="Padding.Is4.OnX.Is4.FromTop">
            @Body
        </LayoutContent>
    </Layout>
</Layout>
其中新增TopMenu,用于顶部菜单渲染。
TopMenu
顶部菜单,保持默认Blazor模板的一个About链接按钮,采用Blazorise组件实现。
@using Blazorise.Localization

<Bar Breakpoint="Breakpoint.Desktop" Background="Background.Light" ThemeContrast="ThemeContrast.Light">
    <BarMenu>
        <BarEnd>
            <BarItem>
                <BarLink To="https://github.com/Megabit/Blazorise" TextColor="TextColor.Primary">About</BarLink>
            </BarItem>
        </BarEnd>
    </BarMenu>
</Bar>
NavMenu
左侧菜单具体菜单项保持一致,组件更换为Blazorise组件
<Bar Breakpoint="Breakpoint.Desktop" NavigationBreakpoint="Breakpoint.Tablet" ThemeContrast="ThemeContrast.Dark" Mode="BarMode.VerticalInline" CollapseMode="BarCollapseMode.Small">
    <BarToggler />
    <BarBrand>
        <BarItem>
            <BarLink To="">
                BlazoriseDemo
            </BarLink>
        </BarItem>
    </BarBrand>
    <BarMenu>
        <BarStart>
            <BarItem>
                <BarLink To="/">
                    <BarIcon IconName="IconName.Dashboard" />
                    Home
                </BarLink>
            </BarItem>
            <BarItem>
                <BarLink To="/counter">
                    <BarIcon IconName="IconName.Comment" />
                    Counter
                </BarLink>
            </BarItem>
            <BarItem>
                <BarLink To="/weather">
                    <BarIcon IconName="IconName.Wheelchair" />
                    Weather
                </BarLink>
            </BarItem>
        </BarStart>
    </BarMenu>
</Bar>
Routes
路由接入Blazorise的组件,增加主题色,当然也可以去掉这层,此处并非必选项。
<Blazorise.ThemeProvider Theme="@theme">
    <Router AppAssembly="typeof(Program).Assembly">
        <Found Context="routeData">
            <RouteView RouteData="routeData" DefaultLayout="typeof(Layout.MainLayout)" />
            <FocusOnNavigate RouteData="routeData" Selector="h1" />
        </Found>
    </Router>
    <MessageProvider />
    <PageProgressProvider />
</Blazorise.ThemeProvider>

@code {
    private Theme theme = new()
    {
        BarOptions = new()
        {
            HorizontalHeight = "72px"
        },
        ColorOptions = new()
        {
            Primary = "#0288D1",
            Secondary = "#A65529",
            Success = "#23C02E",
            Info = "#9BD8FE",
            Warning = "#F8B86C",
            Danger = "#F95741",
            Light = "#F0F0F0",
            Dark = "#535353",
        },
        BackgroundOptions = new()
        {
            Primary = "#0288D1",
            Secondary = "#A65529",
            Success = "#23C02E",
            Info = "#9BD8FE",
            Warning = "#F8B86C",
            Danger = "#F95741",
            Light = "#F0F0F0",
            Dark = "#535353",
        },
        InputOptions = new()
        {
            CheckColor = "#0288D1",
        }
    };
}
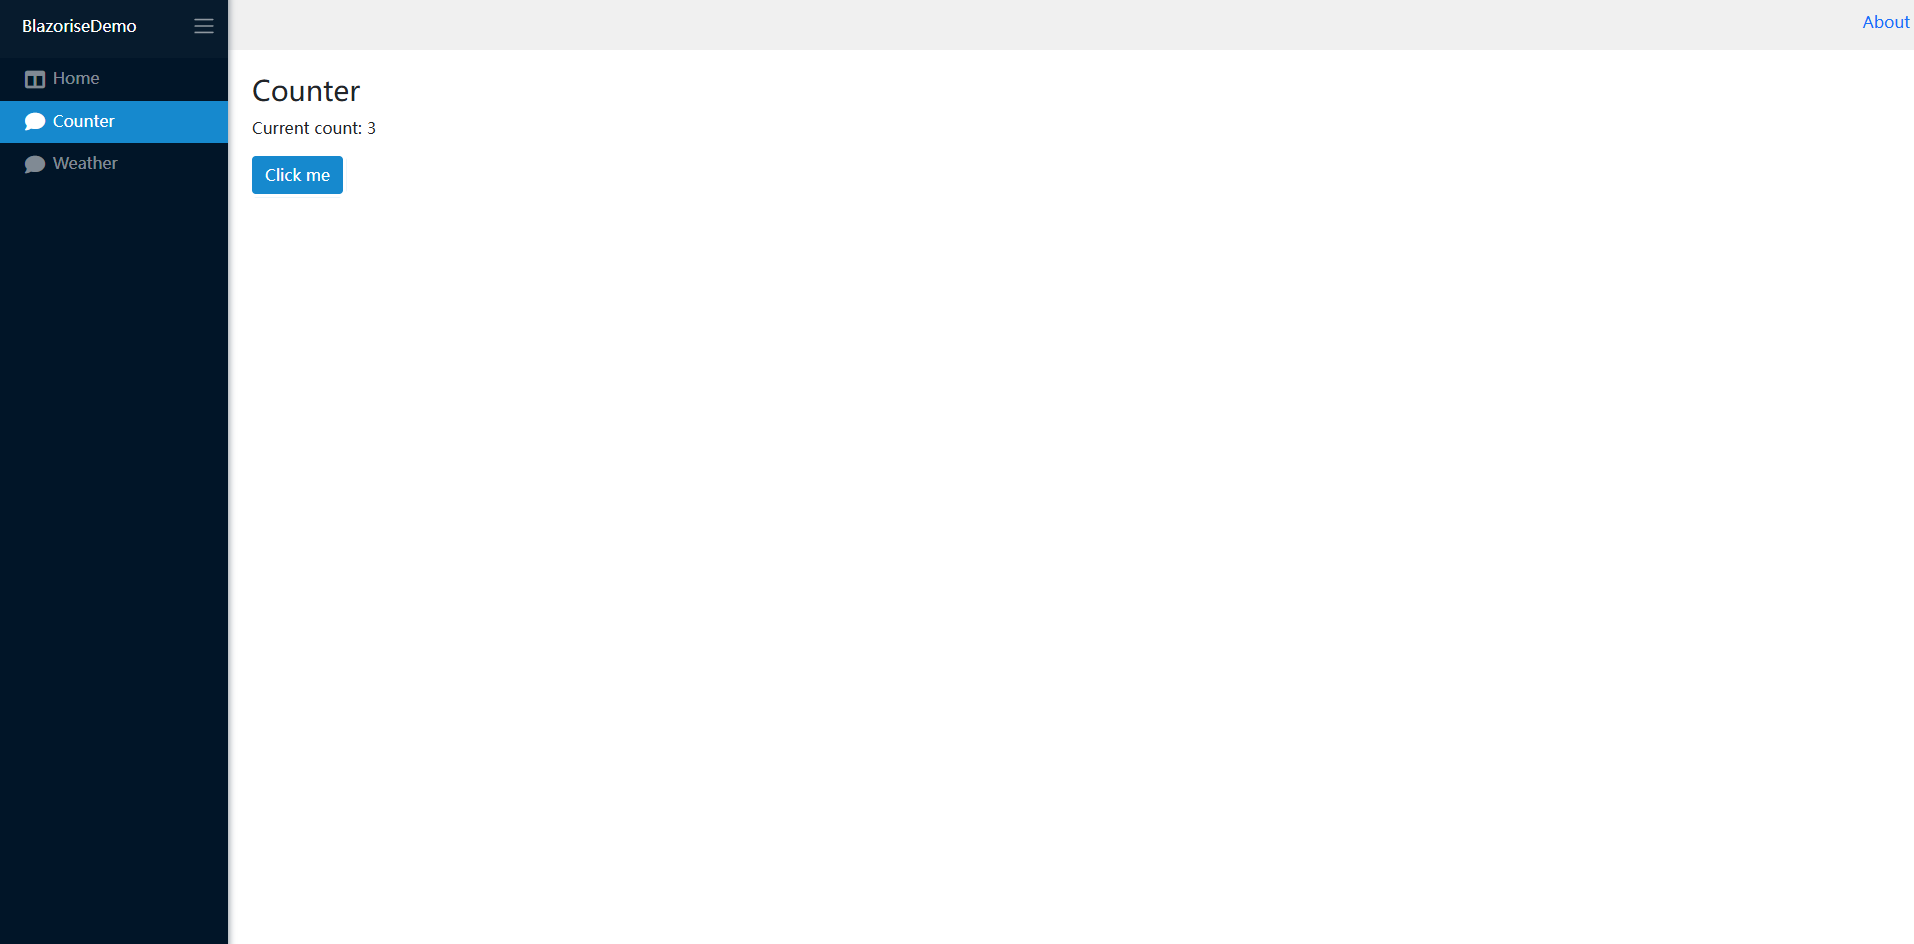
效果呈现
启动运行查看效果,可见Bootstrap5效果如下。
更换CSS框架
仅需几步修改,便能在不修改组件和代码的情况下,更换组件展示的样式和整体页面的风格。
App
将App.razor中依赖css和js更换成AntDesign的css和js
<!DOCTYPE html>
<html lang="en">

<head>
    <meta charset="utf-8" />
    <meta name="viewport" content="width=device-width, initial-scale=1.0" />
    <base href="/" />

    @* bootstrap5 *@
    @* <link href="https://cdn.jsdelivr.net/npm/bootstrap@5.3.3/dist/css/bootstrap.min.css" rel="stylesheet" integrity="sha384-QWTKZyjpPEjISv5WaRU9OFeRpok6YctnYmDr5pNlyT2bRjXh0JMhjY6hW+ALEwIH" crossorigin="anonymous">
    <link href="_content/Blazorise.Icons.FontAwesome/v6/css/all.min.css" rel="stylesheet">
    <link href="_content/Blazorise/blazorise.css?v=1.7.6.0" rel="stylesheet" />
    <link href="_content/Blazorise.Bootstrap5/blazorise.bootstrap5.css?v=1.7.6.0" rel="stylesheet" /> *@

    @* antdesign *@
    <link rel="stylesheet" href="https://cdnjs.cloudflare.com/ajax/libs/antd/4.24.15/antd.min.css" integrity="sha512-Ac6zlwN6S+uQSinFAcV27Gd/TtKEDt7XWXn2xWO4Xi9dTbbpT9/vJb+VT5af6nZywrgBD3qUFTb5y1VN4YD94Q==" crossorigin="anonymous" referrerpolicy="no-referrer" />
    <link href="_content/Blazorise.Icons.FontAwesome/v6/css/all.min.css?v=1.7.6.0" rel="stylesheet">
    <link href="_content/Blazorise/blazorise.css?v=1.7.6.0" rel="stylesheet" />
    <link href="_content/Blazorise.AntDesign/blazorise.antdesign.css?v=1.7.6.0" rel="stylesheet" />

    <HeadOutlet @rendermode="InteractiveServer" />
</head>

<body>
    <Routes @rendermode="InteractiveServer" />
    <script src="_framework/blazor.web.js"></script>
</body>

</html>
Nuget
增加Blazorise.AntDesign的Nuget包
<PackageReference Include="Blazorise.AntDesign" Version="1.7.6" />
服务注册
Program.cs服务注册中更换为AntDesign服务。
//...
builder.Services
    .AddBlazorise(options =>
    {
        options.Immediate = true;
    })
    .AddAntDesignProviders()
    //.AddBootstrap5Providers()
    .AddFontAwesomeIcons();
//...
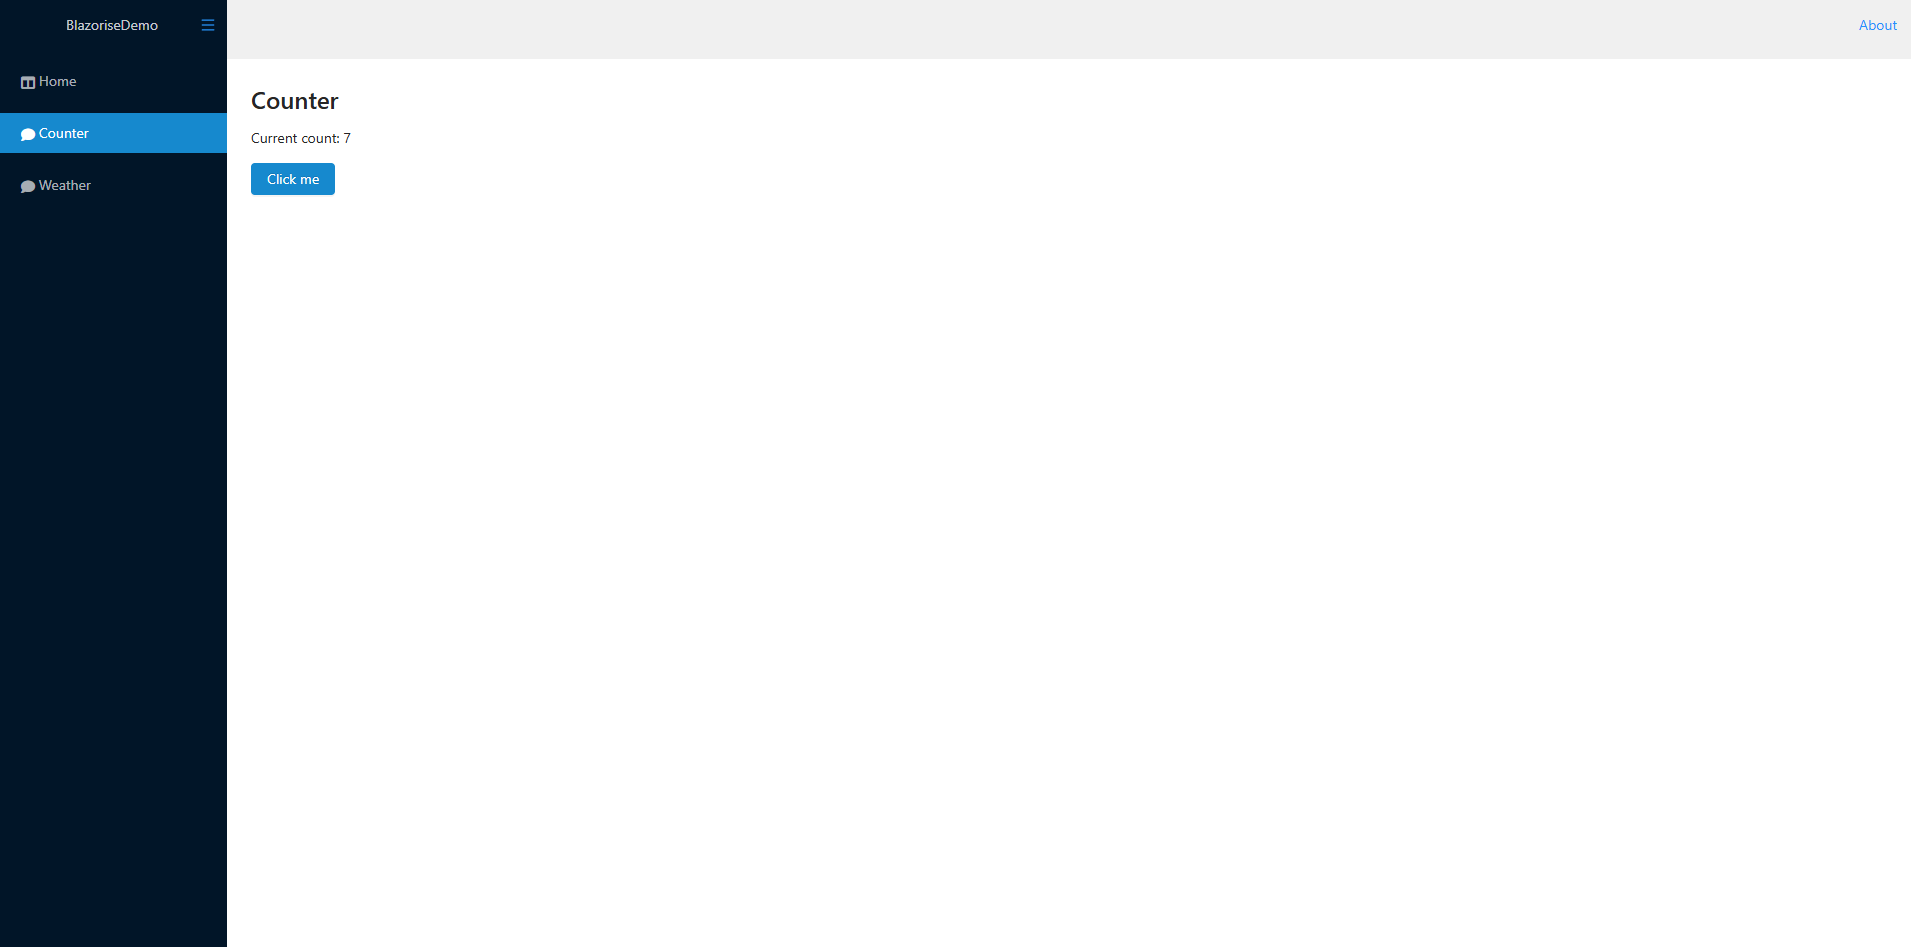
再次启动查看效果,样式风格换成AntDesign的了。如此一来,不修改骨骼(Blazorise组件),只更换皮肤包(Bootstrap/AntDesign/Material/…),便能适配多套css框架。
参考
https://blazorise.com/docs/start
2025-03-18,望技术有成后能回来看见自己的脚步。