Asp.Net Core Blazor&SignalR 后端消息推送
前言
为了能够将后台Job的进度同步前端,借助SignalR和BackgroundJob很方便完成同步。Blazor三种模式下,都能很方便的完成,并且无需引入js包,写前端代码,很是方便。
Blazor Server(WebApp)模式
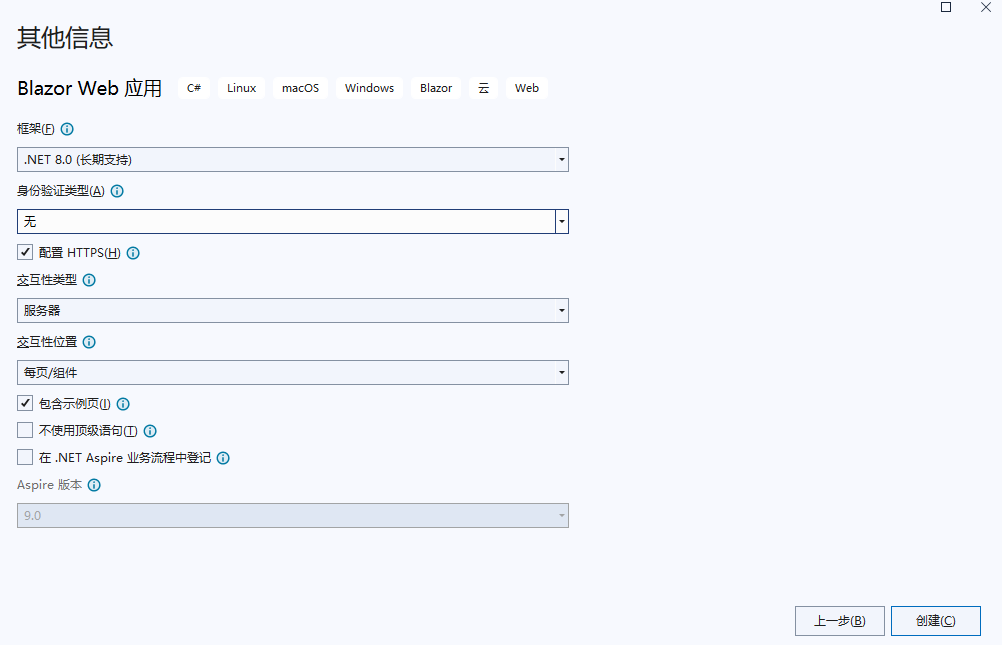
新建项目,选择Blazor WebApp Server模式
 增加Hub,连接前端和后端通信
public class MessageHub : Hub
{
    public async Task SendMessage(string message)
    {
        await Clients.All.SendAsync("ReceiveMessage", message);
    }
}
program.cs中增加端点
// Configure SignalR endpoint
app.MapHub<MessageHub>("/messageHub");
Blazor Server基于SignalR,所以不需要如下SignalR注册
builder.Services.AddSignalR();
添加Nuget包,该包用于前端页面处理SignalR。
<ItemGroup>
  <PackageReference Include="Microsoft.AspNetCore.SignalR.Client" Version="8.0.16" />
</ItemGroup>
新建Blazor页,需要注意请求路径需要与端点路径保持一致。
@page "/message"
@using Microsoft.AspNetCore.SignalR.Client
@implements IAsyncDisposable
@rendermode InteractiveServer
@inject NavigationManager NavigationManager

<PageTitle>Background Messages</PageTitle>

<h3>Background Messages</h3>

<div class="message-container">
    @foreach (var message in messages)
    {
        <div class="message">
            <span class="message-time">@message.TimeStamp.ToString("HH:mm:ss")</span>
            <span class="message-content">@message.Content</span>
        </div>
    }
</div>

<style>
    .message-container {
        max-height: 500px;
        overflow-y: auto;
        border: 1px solid #ddd;
        padding: 10px;
        margin-top: 20px;
    }

    .message {
        padding: 8px;
        margin-bottom: 8px;
        background-color: #f8f9fa;
        border-radius: 4px;
    }

    .message-time {
        color: #666;
        margin-right: 10px;
    }

    .message-content {
        color: #333;
    }
</style>

@code {
    private HubConnection? hubConnection;
    private List<MessageModel> messages = new();
    private const int MaxMessages = 100;

    protected override async Task OnInitializedAsync()
    {
        hubConnection = new HubConnectionBuilder()
            .WithUrl(NavigationManager.ToAbsoluteUri("/messageHub"))
            .WithAutomaticReconnect()
            .Build();

        hubConnection.On<string>("ReceiveMessage", (message) =>
        {
            messages.Insert(0, new MessageModel { Content = message, TimeStamp = DateTime.Now });
            if (messages.Count > MaxMessages)
            {
                messages.RemoveAt(messages.Count - 1);
            }
            InvokeAsync(StateHasChanged);
        });

        await hubConnection.StartAsync();
    }

    public async ValueTask DisposeAsync()
    {
        if (hubConnection is not null)
        {
            await hubConnection.DisposeAsync();
        }
    }

    private class MessageModel
    {
        public string Content { get; set; } = string.Empty;
        public DateTime TimeStamp { get; set; }
    }
}
如此,前后端通信即可配置完毕,接下来增加BackgroundJob,其内部发送消息,从而推送到前端展示。新增BackgroundJob
public class BackgroundJobService : BackgroundService
{
    private readonly ILogger<BackgroundJobService> _logger;
    private readonly IHubContext<MessageHub> _hubContext;

    public BackgroundJobService(
        ILogger<BackgroundJobService> logger,
        IHubContext<MessageHub> hubContext)
    {
        _logger = logger;
        _hubContext = hubContext;
    }

    protected override async Task ExecuteAsync(CancellationToken stoppingToken)
    {
        while (!stoppingToken.IsCancellationRequested)
        {
            try
            {
                _logger.LogInformation("Background job is running at: {time}", DateTimeOffset.Now);

                // 发送消息到所有连接的客户端
                var message = $"Background service message at {DateTime.Now:yyyy-MM-dd HH:mm:ss}";
                await _hubContext.Clients.All.SendAsync("ReceiveMessage", message);

                await Task.Delay(TimeSpan.FromSeconds(20), stoppingToken);
            }
            catch (Exception ex)
            {
                _logger.LogError(ex, "Error occurred while executing background job");
            }
        }
    }
}
program.cs中注册BackgorundService。
// 注册后台服务
builder.Services.AddHostedService<BackgroundJobService>();
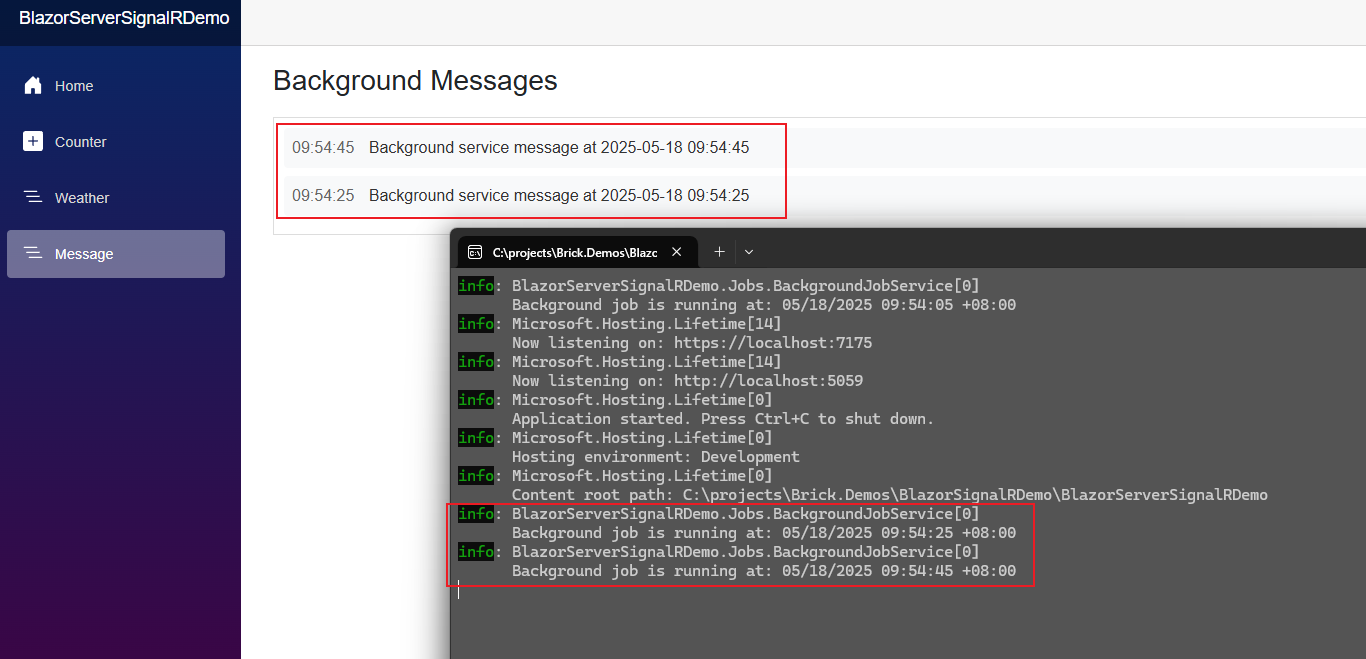
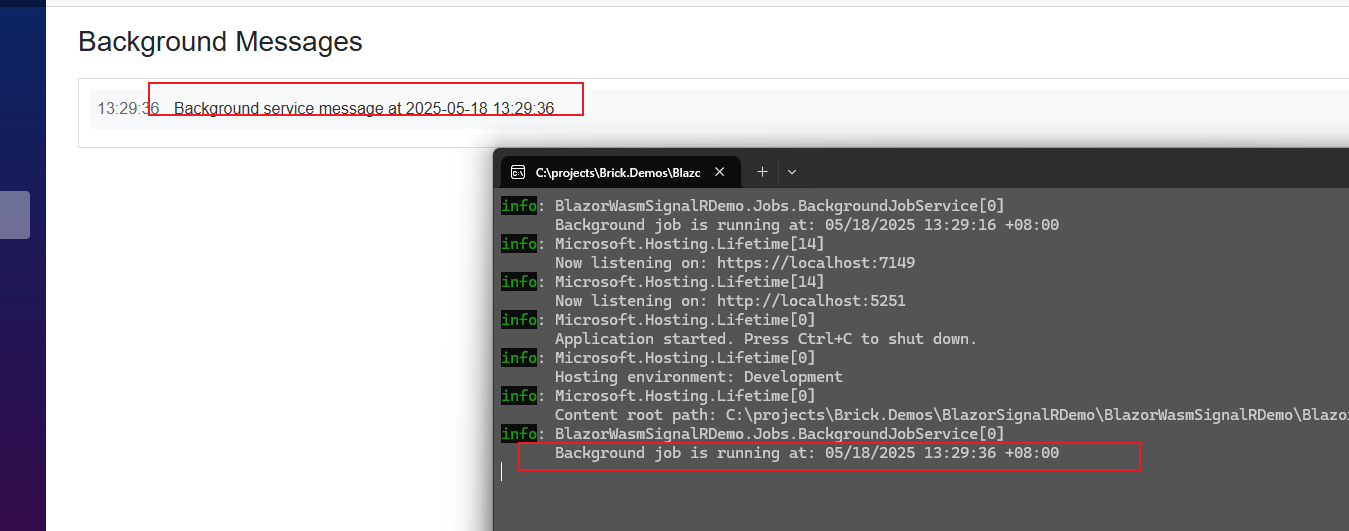
启动运行,如此即可同步后端消息,推送到前端展示。
Blazor WebAssembly(WebApp)模式
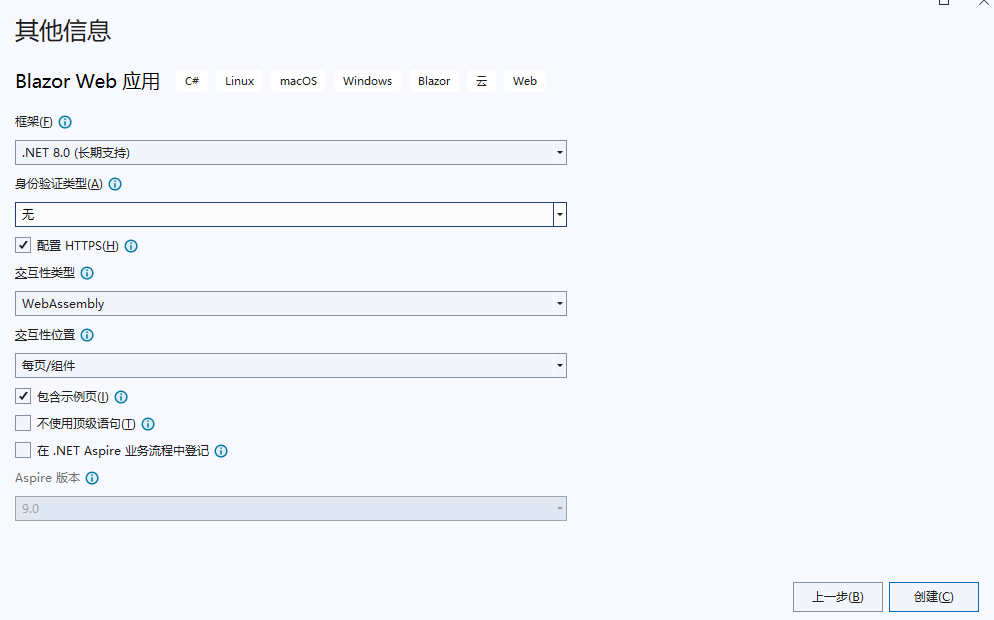
新建项目,选择Blazor WebApp WebAssembly模式
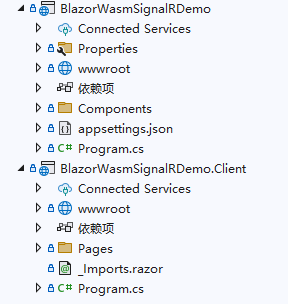
 Demo结构如下
 在主Host中增加Hub
public class MessageHub : Hub
{
    public async Task SendMessage(string message)
    {
        await Clients.All.SendAsync("ReceiveMessage", message);
    }
}
增加BackgroundJob
public class BackgroundJobService : BackgroundService
{
    private readonly ILogger<BackgroundJobService> _logger;
    private readonly IHubContext<MessageHub> _hubContext;

    public BackgroundJobService(
        ILogger<BackgroundJobService> logger,
        IHubContext<MessageHub> hubContext)
    {
        _logger = logger;
        _hubContext = hubContext;
    }

    protected override async Task ExecuteAsync(CancellationToken stoppingToken)
    {
        while (!stoppingToken.IsCancellationRequested)
        {
            try
            {
                _logger.LogInformation("Background job is running at: {time}", DateTimeOffset.Now);

                // 发送消息到所有连接的客户端
                var message = $"Background service message at {DateTime.Now:yyyy-MM-dd HH:mm:ss}";
                await _hubContext.Clients.All.SendAsync("ReceiveMessage", message);

                await Task.Delay(TimeSpan.FromSeconds(20), stoppingToken);
            }
            catch (Exception ex)
            {
                _logger.LogError(ex, "Error occurred while executing background job");
            }
        }
    }
}
在Program.cs中注册Job、注册SignalR服务、配置端点
// 注册后台服务
builder.Services.AddHostedService<BackgroundJobService>();

// 注册 SignalR 服务
builder.Services.AddSignalR();

app.MapHub<MessageHub>("/messagehub");
在Client中增加SignalR的Nuget包
<PackageReference Include="Microsoft.AspNetCore.SignalR.Client" Version="8.0.16" />
增加Blazor页面
@page "/message"
@rendermode InteractiveWebAssembly
@using Microsoft.AspNetCore.SignalR.Client
@inject NavigationManager NavigationManager
@implements IAsyncDisposable

<PageTitle>Background Messages</PageTitle>

<h3>Background Messages</h3>

<div class="message-container">
    @foreach (var message in messages)
    {
        <div class="message">
            <span class="message-time">@message.TimeStamp.ToString("HH:mm:ss")</span>
            <span class="message-content">@message.Content</span>
        </div>
    }
</div>

<style>
    .message-container {
        max-height: 500px;
        overflow-y: auto;
        border: 1px solid #ddd;
        padding: 10px;
        margin-top: 20px;
    }

    .message {
        padding: 8px;
        margin-bottom: 8px;
        background-color: #f8f9fa;
        border-radius: 4px;
    }

    .message-time {
        color: #666;
        margin-right: 10px;
    }

    .message-content {
        color: #333;
    }
</style>

@code {

    private HubConnection? hubConnection;
    private List<MessageModel> messages = new();
    private const int MaxMessages = 100;

    protected override async Task OnInitializedAsync()
    {
        hubConnection = new HubConnectionBuilder()
            .WithUrl(NavigationManager.ToAbsoluteUri("/messageHub"))
            .WithAutomaticReconnect()
            .Build();

        hubConnection.On<string>("ReceiveMessage", (message) =>
        {
            messages.Insert(0, new MessageModel { Content = message, TimeStamp = DateTime.Now });
            if (messages.Count > MaxMessages)
            {
                messages.RemoveAt(messages.Count - 1);
            }
            InvokeAsync(StateHasChanged);
        });

        await hubConnection.StartAsync();
    }

    public async ValueTask DisposeAsync()
    {
        if (hubConnection is not null)
        {
            await hubConnection.DisposeAsync();
        }
    }

    private class MessageModel
    {
        public string Content { get; set; } = string.Empty;
        public DateTime TimeStamp { get; set; }
    }
}
启动运行后,同样能够看到后端推送到前端消息
Blazor WebAssembly(Standalone)模式
与前两者模式不同,Blazor WebAssembly通常需要额外的后端配合。
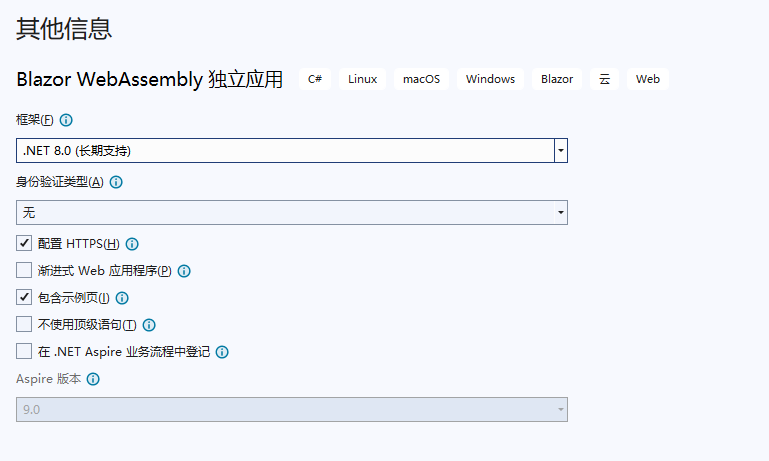
新建Blazor WebAssembly(非Blazor WebApp中的WebAssembly)。
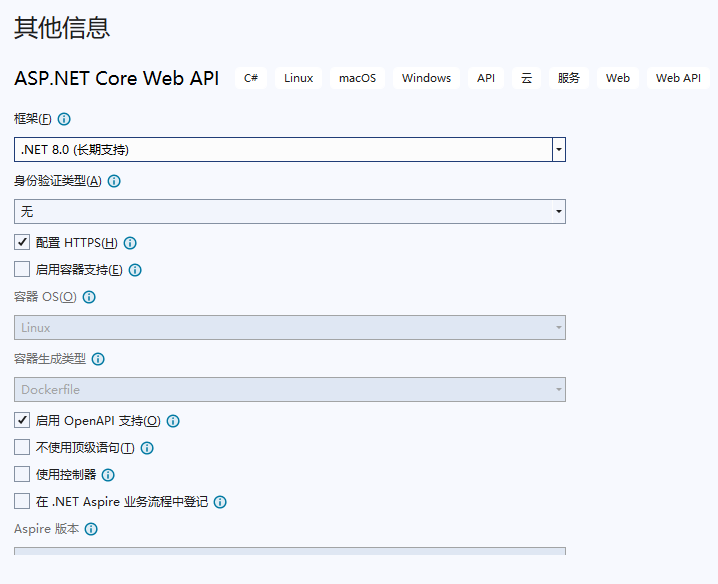
 新建WebApi,用来模拟后端消息同步给前端
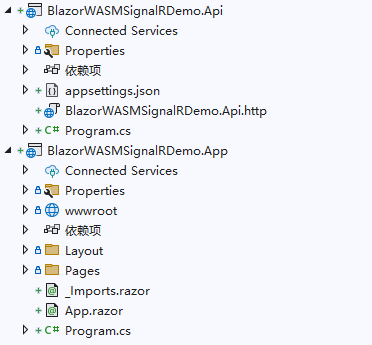
 Demo结构如下
 同样与Blazor Server过程相同,增加Hub到Api项目中
public class MessageHub : Hub
{
    public async Task SendMessage(string message)
    {
        await Clients.All.SendAsync("ReceiveMessage", message);
    }
}
增加BackgroundJob到Api项目中
public class BackgroundJobService : BackgroundService
{
    private readonly ILogger<BackgroundJobService> _logger;
    private readonly IHubContext<MessageHub> _hubContext;

    public BackgroundJobService(
        ILogger<BackgroundJobService> logger,
        IHubContext<MessageHub> hubContext)
    {
        _logger = logger;
        _hubContext = hubContext;
    }

    protected override async Task ExecuteAsync(CancellationToken stoppingToken)
    {
        while (!stoppingToken.IsCancellationRequested)
        {
            try
            {
                _logger.LogInformation("Background job is running at: {time}", DateTimeOffset.Now);

                // 发送消息到所有连接的客户端
                var message = $"Background service message at {DateTime.Now:yyyy-MM-dd HH:mm:ss}";
                await _hubContext.Clients.All.SendAsync("ReceiveMessage", message);

                await Task.Delay(TimeSpan.FromSeconds(20), stoppingToken);
            }
            catch (Exception ex)
            {
                _logger.LogError(ex, "Error occurred while executing background job");
            }
        }
    }
}
在program.cs中注册Job、注册SignalR、配置跨域和设置端点等。
// 添加CORS服务,允许所有来源
builder.Services.AddCors(options =>
{
    options.AddDefaultPolicy(builder =>
    {
        builder.AllowAnyOrigin()
               .AllowAnyMethod()
               .AllowAnyHeader();
    });
});

// 注册后台服务
builder.Services.AddHostedService<BackgroundJobService>();

// 注册 SignalR 服务
builder.Services.AddSignalR();

//...

// 启用CORS中间件
app.UseCors();

// 配置 SignalR 端点
app.MapHub<MessageHub>("/messageHub");
在App项目中,安装SignalR的Nuget包
<PackageReference Include="Microsoft.AspNetCore.SignalR.Client" Version="8.0.16" />
增加Blazor页面
@page "/message"
@using Microsoft.AspNetCore.SignalR.Client
@implements IAsyncDisposable

<PageTitle>Background Messages</PageTitle>

<h3>Background Messages</h3>

<div class="message-container">
    @foreach (var message in messages)
    {
        <div class="message">
            <span class="message-time">@message.TimeStamp.ToString("HH:mm:ss")</span>
            <span class="message-content">@message.Content</span>
        </div>
    }
</div>

<style>
    .message-container {
        max-height: 500px;
        overflow-y: auto;
        border: 1px solid #ddd;
        padding: 10px;
        margin-top: 20px;
    }

    .message {
        padding: 8px;
        margin-bottom: 8px;
        background-color: #f8f9fa;
        border-radius: 4px;
    }

    .message-time {
        color: #666;
        margin-right: 10px;
    }

    .message-content {
        color: #333;
    }
</style>

@code {
    private HubConnection? hubConnection;
    private List<MessageModel> messages = new();
    private const int MaxMessages = 100;

    protected override async Task OnInitializedAsync()
    {
        // Api项目地址
        hubConnection = new HubConnectionBuilder()
            .WithUrl(new Uri("https://localhost:7012/messageHub"))
            .WithAutomaticReconnect()
            .Build();

        hubConnection.On<string>("ReceiveMessage", (message) =>
        {
            messages.Insert(0, new MessageModel { Content = message, TimeStamp = DateTime.Now });
            if (messages.Count > MaxMessages)
            {
                messages.RemoveAt(messages.Count - 1);
            }
            InvokeAsync(StateHasChanged);
        });

        await hubConnection.StartAsync();
    }

    public async ValueTask DisposeAsync()
    {
        if (hubConnection is not null)
        {
            await hubConnection.DisposeAsync();
        }
    }

    private class MessageModel
    {
        public string Content { get; set; } = string.Empty;
        public DateTime TimeStamp { get; set; }
    }
}
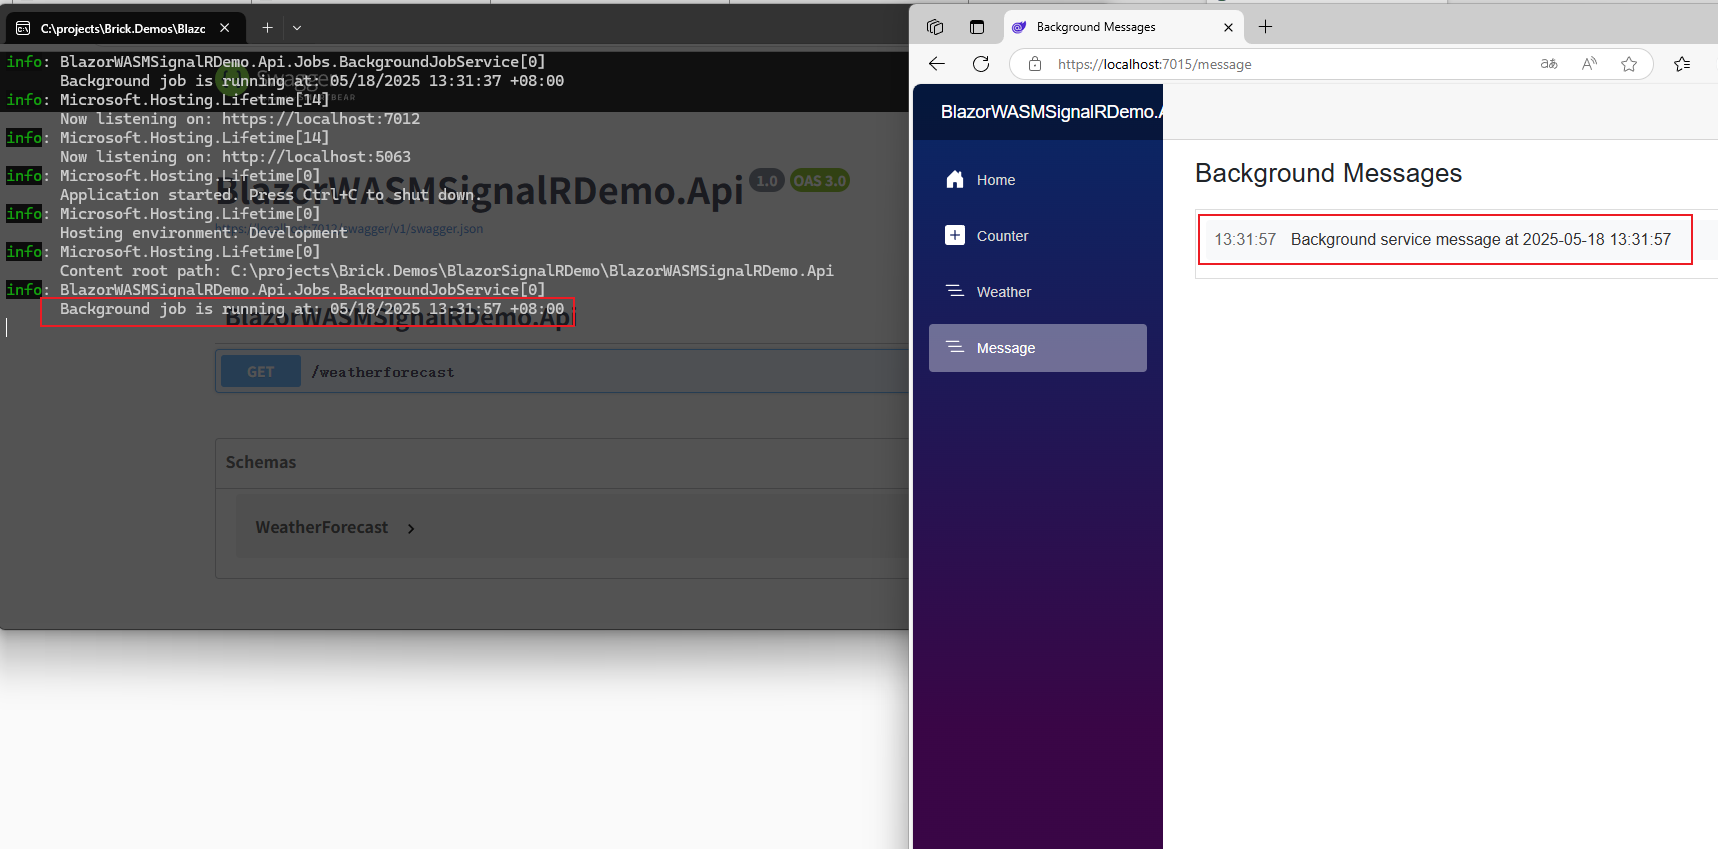
启动项目,后端Api项目Job发送消息到Hub,前端App项目监听消息并展示。
 需要注意这种方式下,请求地址和之前两种模式下不同,原有模式下使用NavigationManager拿到当前服务所在地址。当前服务前后端非一个服务,地址也不同。
总结
三种模式下,完成后端通信到前端及其方便,如此一来,完成服务端到浏览器的一些通知整个过程非常容易上手接入。
参考
2025-04-12,望技术有成后能回来看见自己的脚步。